Monday, February 25, 2008

A custom OpenFileDialog implementation that browses the full file system: MobilePractices.OpenFileDialogEx

Doing a spike yesterday I had the need to use OpenFileDialog to browse and select an existing file. The problem was that I placed the files on the device root. And oops! the Windows Mobile implementation of the OpenFileDialog, this is not a .Net Compact Framework limitation, doesn't allow the user to browse the root. Actually, it doesn't allow the user to browse the whole file system, it just let you browse My Documents subfolders and Storage cards. Very bothering in some cases.

Indeed, this is not the first time I have to deal with it. An I thought I should be just one of many developers with the same problem. So I decided to implement a custom OpenFileDialog in c# targeting PocketPC, but easily portable to Smartphone, and customizable and extensible as well. Wow! I think I should have said that first of all, it's a very simple piece of code. And that's its best feature. You can use it as a starting point.

I've not implemented the full Filter feature of the original OpenFileDialog because I think it's not a common scenario on mobile development and it make the UI overcrowded. Instead, the Filter property of my MobilePractices.OpenFileDialogEx implementation, is just a search pattern.

The MobilePractices.OpenFileDialogEx looks this way:

image

The dialog title can be changed as you wish thru the Text property. At the top of the screen, you can see a ComboBox which can be used to quickly go back to an specific folder.

image

Taking a look at the first snapshot you can notice that I'm identifying storage cards with a different icon. To identify a storage card you can check if the FileInfo.Attributes for it are Directory and Temporary.

if ((info.Attributes & (FileAttributes.Directory | FileAttributes.Temporary))
== (FileAttributes.Directory | FileAttributes.Temporary))
return FileSystemKind.StorageCard;

How to continue with this is up to you. You can add an InitialDirectory property, or some way to keep the current path along the application run, or a modified version which allows you to select a directory instead of a file. Or you can take the code and port it to smartphone. Probably I'll do that soon in a new post. Once more, this is just a starting point!


Here you have the source code including a sample application:


Enjoy!

Sunday, February 24, 2008

Working with forms: How to hide the 'x' button or show an 'ok' button instead

A very common question when you start to work with forms and the .Net Compact Framework is how to replace the 'x' button on the title bar with an 'ok' button. By default, a new form is created showing an 'x' button, which is a minimize box on the title bar:

 image

In runtime, it behaves as a minimize button, when the user press this button the form is minimized. Sometimes we prefer to replace this button with an 'ok' button, as in a dialog. This is very easy. Just open the form on design mode and change the MinimizeBox property to false:

image

Now we have a new 'ok' button which will close the form in runtime setting the form DialogResult property to DialogResult.OK

image

If you want to hide both buttons, you can set the ControlBox property of the form to false.

image

Now the form doesn't have any buttons on the title bar.

image

Indeed, all these from properties can be changed programmatically from your code. It's really easy! Isn't it?

Thursday, February 14, 2008

How to deploy the .Net Compact Framework and SQL Server Compact Edition

If we've developed a .Net Compact Framework application, we'll need to have the .Net CF installed on the device before the application is launched. It's the same case if we're using SQL Server Compact Edition, it should be installed on the device or our application will not able to open the database. So very obvious, but so very important. It's particularly important when we're designing a deployment strategy.

We already know how to create a .cab installer for the application, but we also know that there is no way to define dependencies in a cabinet file. We cannot say that OurApp.cab depends on the compact framework cab files and/or the SQLSCE cab installer.

And how can we do it?

During the development process, Visual Studio deploys both components to the device/emulator when needed, but this is not a feasible method when your app has been brought to production. We need to check manually if the .Net CF and SQLSCE are installed on the device and deploy them if needed. I suggest the following options to do this:

1) Using a desktop Installer

*If a desktop installer is an option* in your scenario, you can build an MSI which register the .cab installers, and using ActiveSync/WMDC checks if it's necessary to deploy and install each one. You can take a look at this very helpful article by Stan Adermann explaining how to create an MSI Package that detects and updates the .Net Compact Framework. Nice stuff.

2) Using a third party update library

You can use a library like the Q4Tech Mobile Updater Application Block which is an open source library which can be customized according with your scenario, or some similar one.
Update (04/29/2009): The Q4Tech Mobile Updater has been moved to the MobileContrib project at codeplex under MS-PL License.

3) Create a light-weight native installer

You can create a native application (i.e. using Visual C++) which will be installed on the device and should check whether the .Net CF is already installed, get the cab if needed, and launch it. Once the .Net CF is installed it can continue updating SQLSCE and the app assemblies. An alternative is just use this native installer to install a new managed installer application which can do the remaining work.
This option needs also a server-side component to publish the .cab installers to the native client. It can be in its minimal version just a web server publishing the .cab files.

You can choose the option which fits better on your scenario, and probably another good option for you can be to use third-party products or if you want, you can even include separate framework files on your .cab file, but it needs lot of work and it will carries on with security problems if you need to sign your application.

As you can see, deployment is not a trivial part of the mobile application development. The deployment strategy you design will have a big impact on the success of your project. I hope this post helps you achieving that success. Stay tuned!

Sunday, February 10, 2008

GZip compression/decompression support on .Net Compact Framework 3.5 out of the box!

Along several years doing mobile development the main thing I've learned is that a mobile device is a resource constrained device, and it will impact directly and inevitably into our software architecture. Part of the problem are the small storage space and the limited communication bandwidth, and trying to tackle both problems a very good option is the usage of compression tools, but moderately, we should keep in mind that compression and decompression are processes which require processor and can be very expensive in terms of resource management.

The .Net CF 3.5 is the first version that includes compression support out of the box! In the past we had to rely on third party libraries or, what is even worst, build our own compression library.

In this version, we can find the GZipStream class included in the System.IO.Compression namespace.

It's indeed a very nice and expected addition to the .Net Compact Framework. Now it's time to start using it!

Wednesday, February 6, 2008

Creating .testrunConfig files to run .Net Compact Framework Unit Tests on different platforms and devices

Currently we have the possibility to run .Net CF unit tests on the device (or emulator) and additionally, we can include unit test runs on our automated build processes. In the first case, it's very important to know how to define where the unit tests will run; and that is possible using test run configuration files (.testrunConfig).

By default, when you create a Smart Device Unit Test project, Visual studio includes a "[SolutionName].testrunConfig" file into the Solution Items folder, as follows:

image

It includes the default configuration according to your project platform. If you double click the .testrunConfig file, it will be open with the Test Run Configuration Editor, a very friendly tool which help us to edit a .testrunConfig file using a nice UI which looks like this:

image

We can also modify the file with the XML Editor if you right click on the file and select "Open with...". But let's see what we can do using this Test Run Configuration Editor.

Unfortunately, Code Coverage is not supported for Smart device projects, but you can play around with the other options, and particularly in this post, I want to focus on the Hosts group.

image

Here we can define on what platform we want to our unit tests run:

image 

Or even better, we can define the device where the unit tests will run:

image

Very cool stuff! Does It mean that we can change the settings targeting a different platform whenever we need to run the tests on it? Yes, but we can have more than one .testrunConfig files, which means we can have different configurations on each file.

We can change the settings as follows and press the Save As... button

image

And save the file as SmartphoneWM5.testrunConfig

image Now we have two .testrunConfig files in the solution, and we can add a third one right clicking the solution and selecting Add - New Item... and selecting Test Run Configuration in Categories:

image

And entering and applying the settings on the Test Run Configuration Editor. Now we have three .testrunConfig files on the solution. How we select the current Test Run Configuration file?. Just go to Test menu and select it!

image

Or if you're using MSTest.exe to run the tests from the command line or an automated build, you can select the .testrunConfig file using the /runconfig parameter as I did in this post.

<Exec Command="MSTest /testcontainer:bin\debug\testproject1.dll /runconfig:..\SmartDeviceTestRun.testrunconfig" />


Nice! Now you can create several configuration files and run your tests on different platforms and devices. Enjoy!

Saturday, February 2, 2008

How to create a windows mobile (Smart Device) .Cab installer

This time I'm going back to a basic topic: How to create a windows mobile installer for our mobile (Pocket PC / Smartphone)application. I've already blogged before about how to build a .cab which registers the assemblies on the .Net CF GAC. But this time I'm focusing on the .cab installer itself.

A Cab file is the default setup format for Windows CE and Windows Mobile devices (similar to windows .msi files). You probably already have installed several application using .cab files, and are familiar with the concept. One point which is often unknown is that .cab files are processed by wceloader.exe, and it can only install one .cab file at a time. That means we cannot have nested .cab files. It doesn't mean we cannot have .cab files contained by another .cab, but the contained .cab files will not be installed during the installation of the container .cab. We should install it manually after the container .cab file installation has been completed.

There are two ways to create a cabinet (.Cab) file. The traditional one, and the friendly VS Smart Device Cab project which doesn't require additional coding, but which also relies on the traditional one at low-level.

Traditionally, the process to create a .cab file was tedious and totally unfriendly. There is a command line tool called CAB Wizard (cabwiz.exe) which still being used to create cabinet (.cab) files. If you follow this link, you can take a look at the documentation for this tool. What the .cab does, is defined on a rather cryptic and confused information (.inf) file which is *kind of* installation script.

The easiest way to build a .cab file is using Visual Studio. It allows us to create Smart Device CAB Projects, including internal project outputs, external files, resource files, required registry entries, shortcuts and more, resulting in a cabinet file after build. Let's see an example:

Walkthrough: How to create a Smart Device CAB Project

Assume we have the following solution:

image

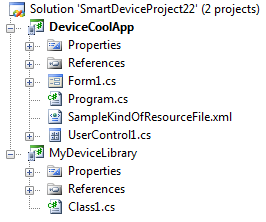
and we want to include a project to create the cab installer for our application, which should:
1) Copy DeviceCoolApp.exe, the referenced assembly MyDeviceLibrary.dll and the resource file called SampleKindOfResourceFile.xml to the application folder.
2) Additionally, it should create a shortcut in the Programs folder on the device and
3) Set the string value HKLM\Software\Mobile Practices\DeviceCoolApp\Version to "1.0".

First of all, we need to add a new Smart Device CAB Project to the solution: Right click on the solution, Add - New Project...

image

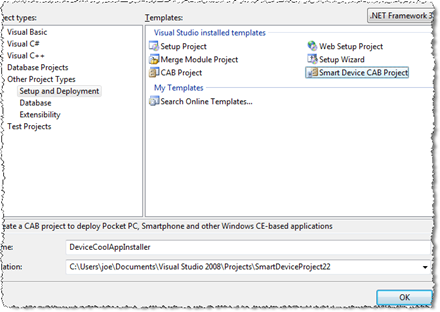
Call it DeviceCoolAppInstaller and press OK. The new project will appear at the bottom in the Solution Explorer window.

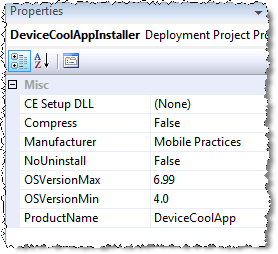
Now, I recommend we change the project properties to get a *nice* product installation. Set the Manufacturer (Mobile Practices) and Product Name (DeviceCoolApp) as follows:

image

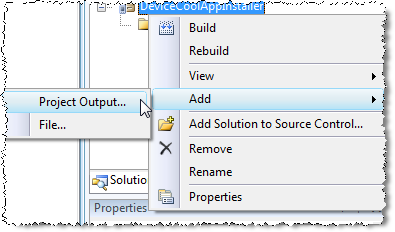
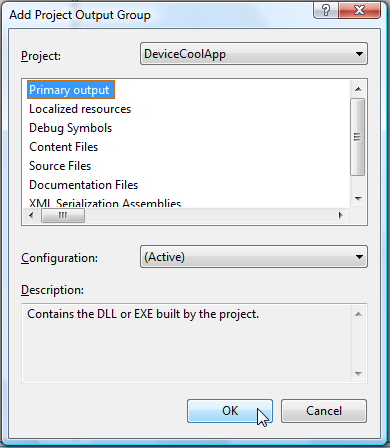
It's time to add DeviceCoolApp.exe (the DeviceCoolApp project output) to the CAB Project. Right click on DeviceCoolAppInstaller - Add - Project Output...

image

Select DeviceCoolApp on the Project selector, and Primary Output as follows, and press OK.

image

Visual Studio will detect automatically the DeviceCoolApp dependencies. In this case it will detect MyLibrary.dll

image 

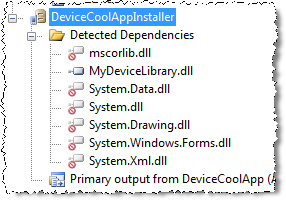
**If the dependencies are not detected, you can rebuild the solution and then Right Click on Detected Dependencies - Refresh Dependencies.

As you can see, due to the automatic dependencies detection, we don't need to add MyDeviceLibrary as Project Output on DeviceCoolAppInstaller.

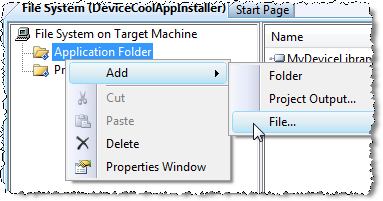
Now it's time to add the resource file SampleKindOfResourceFile.xml which should be installed on the Installation folder. Let's use the File System Editor, having the DeviceCoolAppInstaller project selected press the File System Editor button (btw, it's probably already open).

image

Now, right click on Application Folder - Add - File....

image

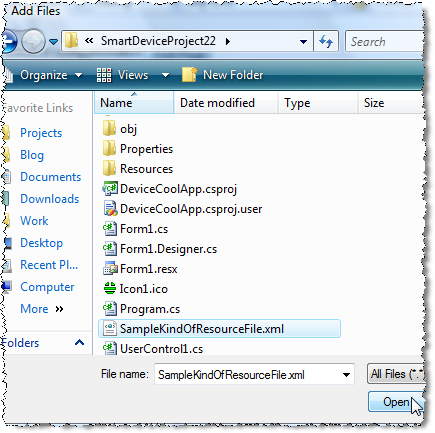
Browse and find SampleKindOfResourceFile.xml and press OK.

image

Congrats!, now we have all the necessary files ready to be installed. The next step is to add the shortcut.

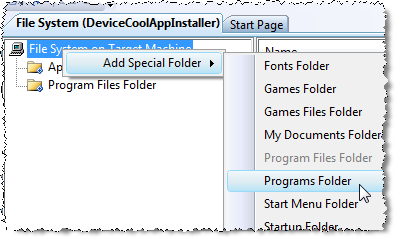
Unfortunately, the Programs Folder is not already included on the File System Editor, and we need to include it manually: Right click on File System on Target Machine - Add Special Folder - Programs Folder.

image

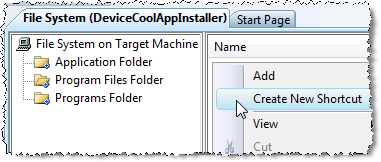
And now, select Programs Folder on the File System tree, and right click on the empty panel at right and select Create New Shortcut

image

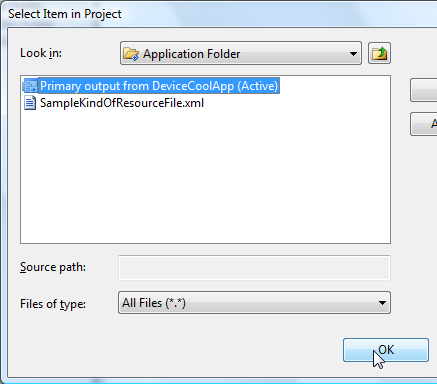
And select Application Folder - Primary output from DeviceCoolApp (Active) and press OK.

image

And rename it to "Device Cool App"

image

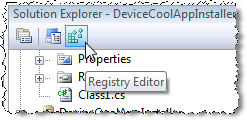
This will be the application shortcut on the Programs group on the smart device after installation. Now we just have to add the registry entry. Press the Registry Editor button:

image

And add the string value "HKLM\Software\Mobile Practices\DeviceCoolApp\Version". You need to create the path key by key, and the add the string value on the right panel.

image

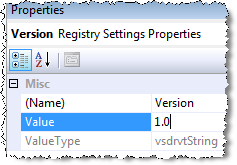
Name it "Version" and then, select it, and enter "1.0" into the Value field on the Properties Window

image

And *voila* the Smart Device CAB Project is done! We're ready to build the solution, right click on the DeviceCoolAppInstaller project and select Build.

You can find the DeviceCoolAppInstaller.cab file in the DeviceCoolAppInstaller\debug folder.

image

We are ready to ship our application and distributing it. If you want to test it (highly recommendable), you can copy it to the emulator (or share de folder to make it visible from the emulator as a Storage Card) or to the device and install it. You can also uninstall it thru the Remove Programs option.

As you can see, in the same folder, there is also a DeviceCoolAppInstaller.inf file. This file is generated by Visual Studio and passed to CabWiz.exe to generate the .cab file. As I've said before, Visual Studio still using the traditional way to build a cabinet file at low-level. But it DOESN'T mean that Visual Studio Smart Device CAB projects are just a graphical front-end for the cabwiz.exe tool. The main advantage of using a Smart device cab project is that it also integrates our development, it automatically updates the .inf file according with the changes we make to our projects, it includes renaming of output files (DeviceCoolApp.exe is not physically linked, if we change the assembly name setting in our project to DeviceCool.exe, we don't need to modify the DeviceCoolInstaller project) and dependencies which are automatically detected.

Well, work is done. Now you can start creating your own smart device cab projects and please don't forget to read my previous post about how to build a .cab which registers the assemblies on the .Net CF GAC which can be also very useful. Stay tuned!

Update (10/28/2008): You can also read a Setup.dll walkthrough for adding a Terms & Conditions dialog before the installation for further info about how to customize a cab installer.